Product Overview
PiSugar Whisplay HAT is a multifunctional expansion board for Raspberry Pi Zero, integrating a display, microphones, speakers, and more to turn it into a portable interactive device.
Product Features
- Power supply voltage: 5V
- Logic voltage: 3.3V
- Audio codec chip: ES8389 / WM8960
- Audio control interface: I2C
- Audio data interface: I2S
- Speaker power: 8Ω 1W
- Screen size: 1.69 inches (30mm*37mm)
- Screen resolution: 240*280 RGB
- Screen controller chip: ST7789
- Screen interface: 4-SPI
Due to the discontinuation of the WM8960 chip, new Whisplay HAT units have been upgraded to the ES8389 audio codec. The Whisplay driver supports both audio codec versions starting from v3.0.0.
Supported Platforms
The current Whisplay driver supports:
- Raspberry Pi boards with a 40-pin header, using the official full Raspberry Pi OS image
- Radxa ZERO 3W (RK3566), using the official Debian 12 Bookworm image
- Radxa Cubie A7Z (Allwinner A733), using the official Debian 11 Bullseye image
Due to circuit incompatibility, the Whisplay HAT physical button is not safe to use on Radxa Cubie A7Z. Do not press the button, otherwise the A7Z may shut down or lose power immediately.
Hardware Resources
Pin Function and Raspberry Pi Pin (Physical Pin Number) Correspondence
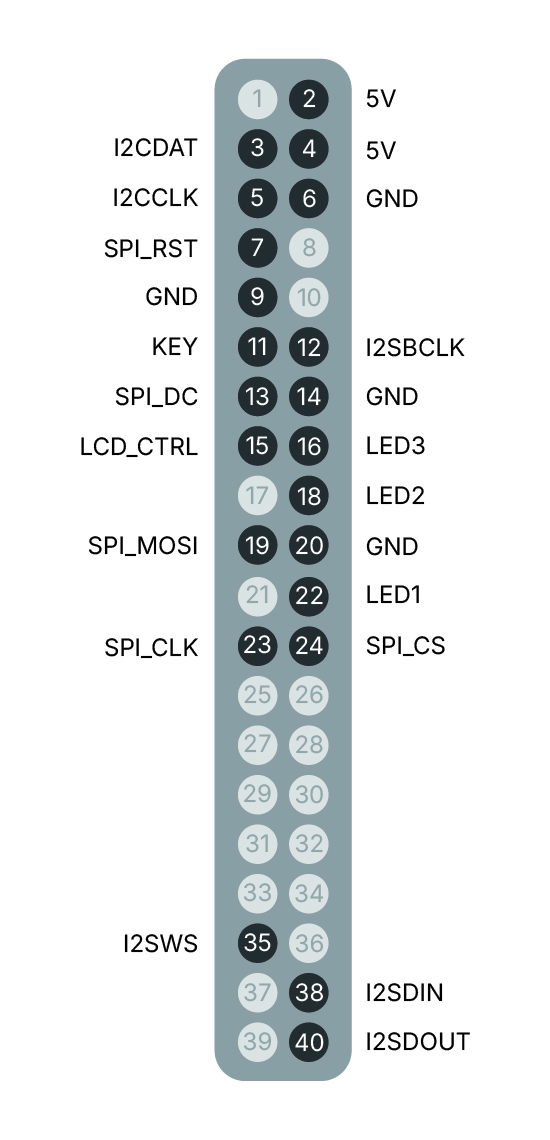
| Pin Function | Pin Number | Pin Function | Pin Number | Pin Function | Pin Number | Pin Function | Pin Number |
|---|---|---|---|---|---|---|---|
| 5V | P2, P4 | LED1 | P22 | LCDCTRL | P15 | I2SWS | P35 |
| GND | GND | LED2 | P18 | SPI_RST | P7 | I2SDIN | P38 |
| I2CDAT | P3 | LED3 | P16 | SPI_DC | P13 | I2SDOUT | P40 |
| I2CCLK | P5 | SPI_MOSI | P19 | ||||
| KEY | P11 | SPI_CLK | P23 | ||||
| SPI_CS | P24 |
External Speaker Support
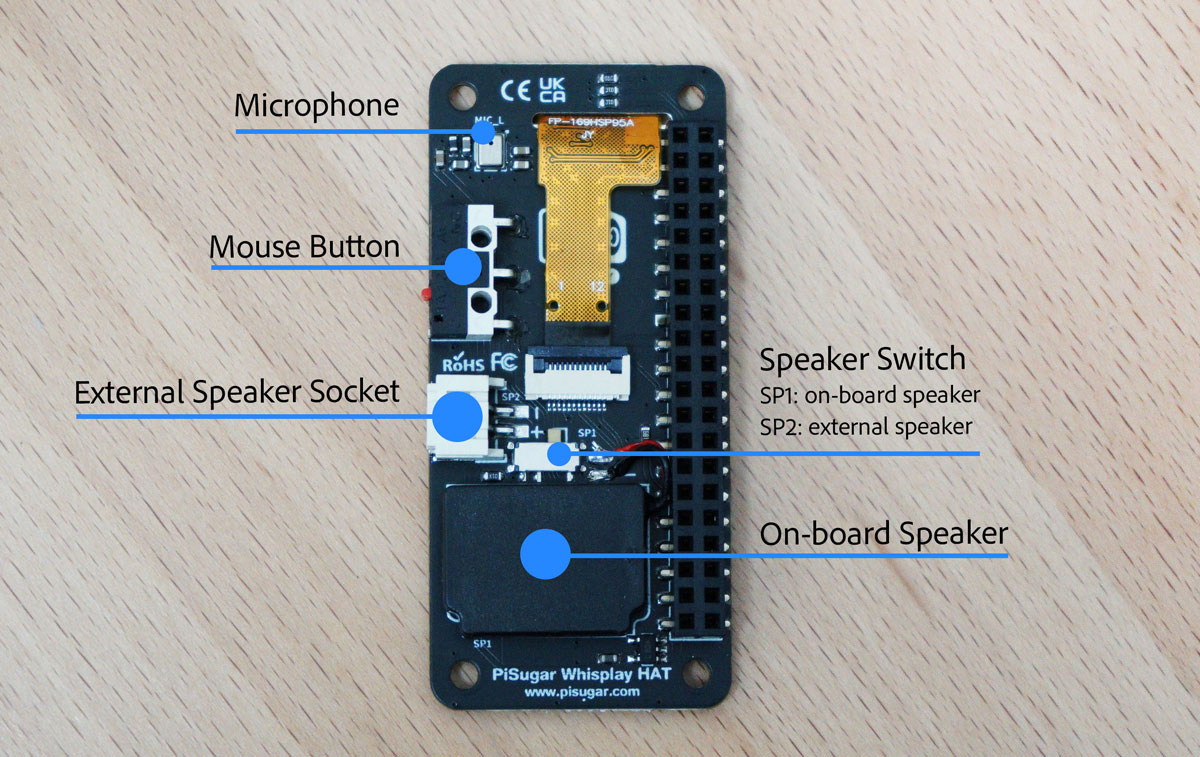
Whisplay allows enhanced audio flexibility. You can switch to an external speaker using the dedicated control.
Compatible speakers must be single-channel mono speakers and use a PH2.0 connector.
Getting Started
The Whisplay driver is maintained on GitHub: https://github.com/PiSugar/Whisplay
The develop branch uses a unified installer that detects the current platform and runs the matching platform script.
git clone https://github.com/PiSugar/Whisplay.git --depth 1
cd Whisplay
sudo bash install_driver.sh
sudo reboot
The installer enables the buses required by Whisplay. I2C and I2S are used by the Whisplay audio codec, while SPI is used by the LCD.
Audio Function
Sound Card Detection
If you are using PiSugarS (Plus) as well, please make sure to turn off the AUTO switch on PiSugarS (Plus) to avoid I2C conflicts. Otherwise the sound card cannot be detected by the system.
Check playback devices:
aplay -l
Example output:
pi@PI0WH:~ $ aplay -l
**** List of PLAYBACK Hardware Devices ****
card 0: whisplaysound [Whisplay Sound], device 0: Whisplay HiFi ES8389 HiFi-0 [Whisplay HiFi ES8389 HiFi-0]
  Subdevices: 1/1
  Subdevice #0: subdevice #0
card 1: vc4hdmi [vc4-hdmi], device 0: MAI PCM i2s-hifi-0 [MAI PCM i2s-hifi-0]
  Subdevices: 1/1
  Subdevice #0: subdevice #0
Check recording devices:
arecord -l
Example output:
pi@PI0WH:~ $ arecord -l
**** List of CAPTURE Hardware Devices ****
card 0: whisplaysound [Whisplay Sound], device 0: Whisplay HiFi ES8389 HiFi-0 [Whisplay HiFi ES8389 HiFi-0]
  Subdevices: 1/1
  Subdevice #0: subdevice #0
The sound card number may vary on different systems and hardware. You can use the stable whisplaysound card name in ALSA commands.
Recording and Playback Test
Use the whisplaysound card name in the following commands.
Recording:
arecord -D plughw:whisplaysound,0 -f S32_LE -r 16000 -c 2 test.wav
Playback:
aplay -D plughw:whisplaysound,0 test.wav
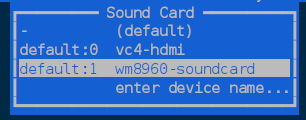
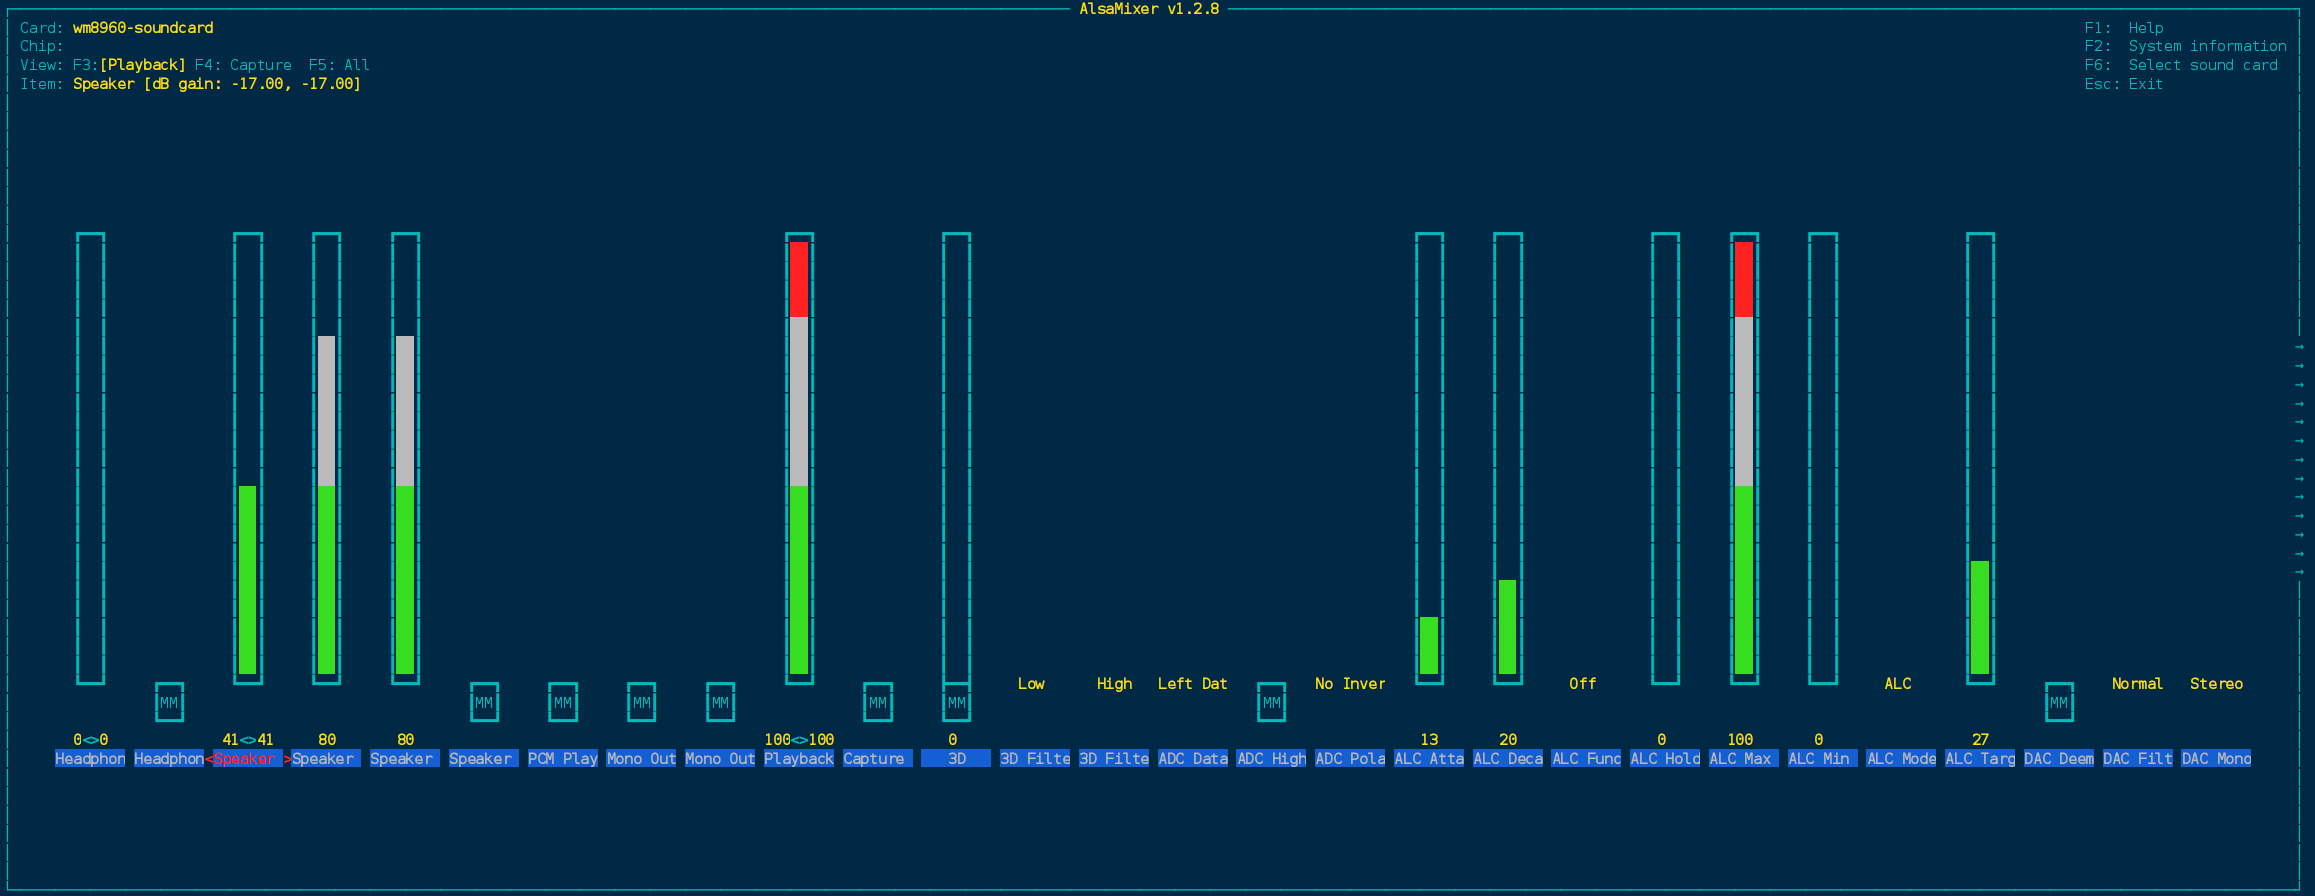
The system also provides a graphical mixer. Open it with the whisplaysound card selected:
sudo alsamixer -c whisplaysound
The default volume is relatively low. It can be adjusted up to around 70; higher values may cause distortion.
You can also check and adjust the speaker volume from the command line:
amixer -c whisplaysound cget name=speaker
sudo amixer -c whisplaysound cset name=speaker 70
Example output:
pi@PI0WH:~ $ amixer -c whisplaysound cget name=speaker
numid=19,iface=MIXER,name='speaker'
  ; type=INTEGER,access=rw------,values=1,min=0,max=100,step=0
  : values=80
Display, Buttons, LED, and Apps
The LCD, RGB LED, and button helpers now live in the runtime/ directory:
runtime/whisplay.py: public Python entry point for LCD, physical button, and LED controlruntime/whisplay_client.py: Python helper for daemon-mode apps
The audio device is installed as a system sound card and should be used through normal ALSA tools or application audio APIs.
Hardware Test
Run the bundled hardware test from the example directory:
cd Whisplay/example
pip install -r requirements.txt --break-system-packages
bash run_test.sh
The script detects the whisplaysound card index, sets AUDIODEV, and runs the full test flow for screen, LED, speaker, button, microphone, and playback.
You can also specify image or sound files:
bash run_test.sh --image data/test2.jpg --sound data/test.mp3
Whisplay Daemon Service
whisplay-daemon is an optional local service that centrally manages the LCD, backlight, RGB LED, button events, and app foreground switching.
When daemon mode is enabled, other apps should register with the daemon instead of directly accessing GPIO or SPI. This lets the daemon own the hardware while foreground apps draw through a shared framebuffer.
Install and start the service:
cd Whisplay
sudo bash daemon/install_whisplay_daemon_service.sh
systemctl status whisplay-daemon.service --no-pager
After installation:
- Settings are stored in
~/.whisplay-daemon/settings.json - App entries are loaded from
~/.whisplay-daemon/app/ - The default socket path is
/tmp/whisplay-daemon.sock - App stdout and stderr can be appended to
~/.whisplay-daemon/daemon-app.logwhenuse_daemon_default_logis enabled
View daemon logs:
journalctl -u whisplay-daemon.service -f
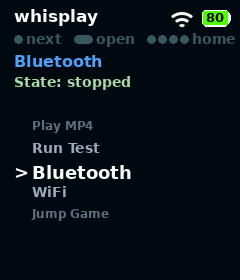
Daemon Desktop
The daemon provides a simple local app launcher:
- Single click: cycle through app entries
- Long press: launch or foreground the selected app
- Four rapid clicks in a foreground app: request the foreground app to exit
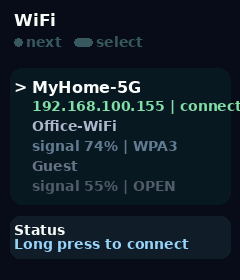
It also includes built-in system pages:
Bluetooth: scans nearby Bluetooth devices and lets you bind or unbind the selected deviceWiFi: scans nearby Wi-Fi networks and lets you connect; protected-network password input depends on an attached external keyboard

The daemon currently supports line-delimited JSON over a Unix socket, with commands such as health.ping, app.register, app.list, app.launch, app.focus.acquire, app.focus.release, app.exit.request, framebuffer.acquire, backlight.set, led.set, led.fade, button.get_state, and events.subscribe.
For third-party app integration, refer to the driver repository guides:
Example Programs
The example directory contains end-user demos. If whisplay-daemon is installed, the default example app entries are seeded into ~/.whisplay-daemon/app/ and shown on the daemon desktop.
| Program | Description |
|---|---|
run_test.sh | End-to-end hardware test for screen, LED, speaker, button, microphone, and playback |
play_mp4.py | Plays an MP4 video on the LCD; requires ffmpeg |
flappy_bird.py | Single-button Flappy Bird demo with game sound effects |
jump_game.py | Single-button jump game with pseudo-3D tilted rendering and sound effects |
To use the MP4 demo, install ffmpeg and download a sample video:
sudo apt-get install ffmpeg
cd Whisplay/example
wget -O data/whisplay_test.mp4 https://img-storage.pisugar.uk/whisplay_test.mp4
sudo python3 play_mp4.py --file data/whisplay_test.mp4
Driver Repository Layout
The current driver repository is organized by responsibility:
install_driver.sh: auto-detecting driver installerscript/: platform-specific install scriptsruntime/: Python runtime modules includingwhisplay.pyandwhisplay_client.pydaemon/: local hardware daemon, systemd installer, internal pages, and default app definitionsaudio/: audio assets and Radxa DTS overlaysexample/: hardware tests and demo applications
Technical Information
Documents
- Schematic Schematic
- 3D model 3D model
- ES8389 Technical Manual ES8389 Technical Manual
- WM8960 Technical Manual WM8960 Technical Manual
- Screen Technical Manual and Source Code Screen Technical Manual and Source Code
Related Projects
| Project | Description |
|---|---|
| whisplay-ai-chatbot | AI chatbot using Whisplay HAT as display and voice control interface |
| whisplay-xiaozhi | XiaoZhi chatbot client implementation for Raspberry Pi with Whisplay HAT |
| whisplay-lumon-mdr-ui | Tiny Lumon MDR device implementation |
| pizero-openclaw | Openclaw project with Whisplay HAT display and voice control |
| pisugar-wx | Weather information display on Whisplay HAT |
Contact Information
For more technical support, please contact: pisugar.zero@gmail.com